
A whole bunch of you expressed interest in how I was picking up stitches in garter for the blanket, and so the other day when I finished one block and began the next, I took a bunch of pictures so I could show you. I experimented with a bunch of techniques at the beginning of this project, and this is what I've found that seems to make them really tidy. A whole bunch of other knitters asked why I was casting off stitches at all. If a pattern calls for casting off and then picking up again, they queried (and it's a reasonable question) why on earth would you bother? Why not just leave the stitches live, placing them on a spare circular or stitch holder until you needed them again? My answer is both personal and technical. First, I like that each square is accomplished and bound off. It makes me feel like I'm "finishing" the squares, and perhaps like I could stop any time I wanted, since every time I bind off I have a blanket of a different size. (That's the personal reason.) The technical reason is that binding off creates stability of a sort, and I think that's valuable to keep the blanket from stretching all over the place. (I talked about that more in this post, and you can read that for more information if you like.) It might all come down to how much you hate binding off/picking up, which is for me... not at all. Knitters choice.
The Log Cabin Moderne calls for several rectangles knit off of each other in different directions, so part of the challenge in picking up stitches is that in one row, you'll be picking up from bound off edges, and then the sides. This means that in one row you'll need two techniques. Here's how I handle it.
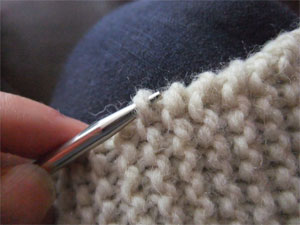
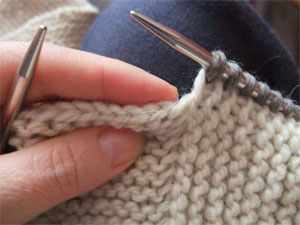
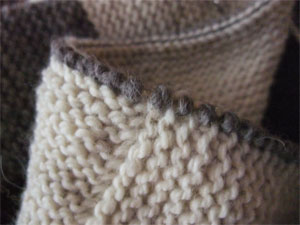
Step 1. Okay. There's a rant here about the loss of knitting techniques/terminologies that I could get into, and if you've taken a class with me then you've likely heard some version of it. Synopsis: In creating directions that are easy to read and use, we've lost fine distinctions between similar techniques. Best example, the distinct and important difference between "pick up" stitches, and "pick up and knit" stitches. One involves a working yarn, the other does not. I advocate knowing how to do both, and using them when they make sense. For creating new stitches along a garter edge, I advocate "picking up" stitches. This includes no working yarn. I work LEFT to RIGHT, and scoop up the stitches that I want. First I identify the loop I want to collect. In this case, its the edgemost ladder of the edgemost garter stitch. (Note that this is not that weird little knot on the very edge of all garter stitch. That sucker is odd, and impossible to collect neatly. Ignore the rotter.)
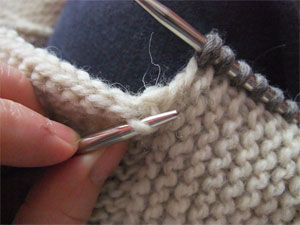
Continuing to work LEFT TO RIGHT, I get all those stitches on the needle, taking care to collect them all in the same manner. This is one advantage of "pick up" rather than "pick up and knit". The stitches aren't distorted by the action of knitting them and therefore it is plain as day whether or not they are picked up properly and uniformly. (It also makes it dead easy to see if you've missed one, which is harder the other way.)
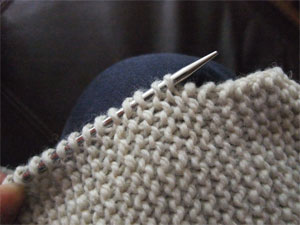
Step 2: When all the little dudes are picked up, including one in the cast on (or off) edge, I examine them all from both sides to make sure that I've always collected the same portion of the stitch, and I get my working yarn.
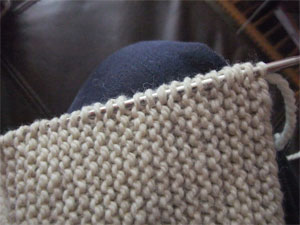
Step 3. I knit them. I insert the needle in the traditional manner. (If I thought that was making a big hole, I might go in the other way. EG: knit into the front of the stitch.)
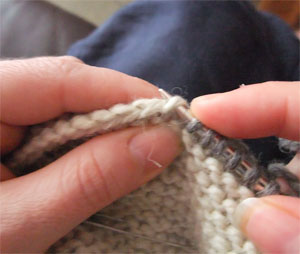
Step 4. Now I'm at the point where the direction of the source knitting changes. Now I'm collecting stitches from the length wise rather than vertical edge of the garter stitch. Since the work has changed direction and what I have to pick up has changed, I'm changing techniques. If I were married to "pick up" rather than "pick up and knit" at this point I would have some trouble collecting the little gaffers. Luckily, I have another way to go about it.
I'm going to switch to "pick up and knit".
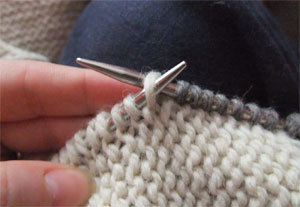
Step 5. I find the first loop of the source bind off, and choose the inner leg. I know that right about now some of you lost your everloving minds. You are coming unglued because you've always been taught that you should pick up both legs, because the work is allegedly stronger. Well... I know no master and this works better for me. In my experience, picking up both legs isn't any stronger. Most knitting is one single strand of yarn carried through another single strand, and I don't see any reason to change here, and picking up both strands creates a large ridge on the other side of the work that I don't care for, especially in a project like a blanket. Not doing it, and it works just fine.
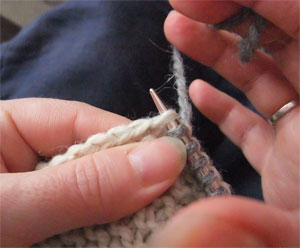
Step 6: Once I've identified which leg I'll be picking up, and had a good look-see at its location, I'm off. I pick up and knit the stitches in order, being sure not to miss one. I come UP THROUGH THE STITCH. Bottom to top...
and then knit it like a regular stitch. Some people like to twist that stitch. I think it makes an already bound section more bound and creates a pucker. I don't do it either.
Ta dah! This is the wrong side, where you can see that the leftover leg snuggles right down into the source garter stitch and is practically invisible.
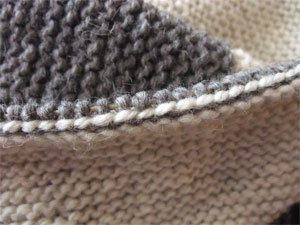
This is the public side, where it looks - to my way of thinking, very tidy indeed.
Finished, front...
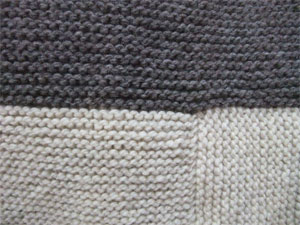
and back.
In other blanket news, I've been grounded for a couple of hours by a dye lot problem I'm not ready to talk about.
(Also, the fact that it is a million degrees (Celsius) in an un-airconditioned house makes draping this thing on my lap seriously unappetizing. Gotta figure a way around that.)
This is a very clear lesson, Stephanie! I'm about to sew together my Four Seasons, which has garter edges, and I think I can figure out how to do it, from what you have explained! Thanks!!! samm
Posted by: samm at June 24, 2009 3:51 PMIt sure looks like you are picking up stitches from left to right in that first section. Other than that it makes perfect sense.
Posted by: marie in NJ at June 24, 2009 3:53 PMVery clear -- thanks so much for the tutorial, Steph! Can't wait to try it, even though I'm going to change horses in the middle of my log cabin stream!
Posted by: Laura at June 24, 2009 3:55 PMThank you !!!!!!!!!!!!!
Posted by: Jo-Anne at June 24, 2009 3:55 PMThank you for that very clear explanation. The pictures make all the difference. I'm still not sure how you manage to make it look that good but I guess that's where the years of experience come in. I'll certainly be referring back to this post the next time I need to pick up garter stitch.
Posted by: Sarah at June 24, 2009 3:57 PMi've come to realize over the years that the beauty of a thing is really in the precision and care you take in the details. i am both impressed by and inspired to work with your degree of precision the next time i am in a "pick up and/or knit" situation. thanks for illustrations!
Posted by: christine m. east of toronto at June 24, 2009 3:57 PMThank you for the clear pickup instructions. I'll be hosting a Baby Surprise Jacket KAL in Ravelry in about 10 days and I just may direct KALers to your excellent garter stitch pick up advice when we are ready for that stage of the BSJ.
For hot weather I like to plop my knitting on my dining room table and sit there to keep the knitting off of me. I stay cooler that way.
Posted by: Sue at June 24, 2009 3:58 PMThank you for the lesson. I have wondered why some patterns say "pick up" and some say "pick up and knit." Nows I knows!!Makes perfect sense,too!I usually try to find a fan and point it right at my hands when doing my handiwork when it's a gazillion degrees out(and in)side.Don't know if one fan would be enough for you and the whole blanket,though...
Posted by: Kim(with kids) at June 24, 2009 4:00 PMThanks for great directions. I also pick up only one leg on a bound off edge.
Posted by: Carol at June 24, 2009 4:01 PMThank you, it was simply shown and well explained. Now to actually copy this into my demo file.
Posted by: Christine at June 24, 2009 4:04 PMDo you mean to pickup the yarn in the direction that one reads words on a page, left to right? Is that what in mean when you say to pick up RIGHT TO LEFT? From the way it looks in the pictures, you are picking up the stitches from the left side of the work to end on the right side. Or am I missing something, like you are talking about the individual stitches.
Posted by: stacey at June 24, 2009 4:05 PMBeautiful! And do you do the same 1-leg, no twist on sock gussets? (hey, that sounds like a new dance move!)
Posted by: Su at June 24, 2009 4:06 PMThank you thank you thank you. I learned to knit a long (long) time ago from Knitting Without Tears. I was home sick from school in the 4th grade. Of course, like any other acolyte, it's my go to knitting book so, in the true spirit of EZ, I end up just figuring out things as I go along. Not always the best way. However, I also believe that, in the true spirit of EZ, the best way to learn is from other people!
Thanks for this tutorial. 35 years later, I finally learned the right (and easy) way to do this.
Possible solution for hot blanket on lap when hot: Do you still have one of those little kid's TV trays knocking about your house? The kind that lets kids sit on the couch and eat supposedly resulting in less mess than just a plate-in-the-lap? The trays usually decorated with cartoons and are given to you by a grandma or aunt and bent weirdly because someone trod on it. Anyhow, you can sit on the couch, place TV tray over your lap, place hot blanket on the TV tray and still have the all important air circulation around the thighs.. QED
Posted by: Sharilyn at June 24, 2009 4:13 PMThanks for this. If only you had posted this a month ago, while I was making my log cabin baby blanket, it would have looked so much better. But hey, now I'm ready for the next one. I also did not know there was a difference between "pick up" and "pick up and knit". (oh, and yeah, are you sure about the left/right thing?)
Posted by: Kelly at June 24, 2009 4:13 PMVery helpful! I've always wondered about the difference between "pick up" and "pick up and knit" and now I understand why they're different. I think I was using pick up and knit for all purposes, but now I'll remember the difference. The way you've done it really does look so nice and clean on the reverse side of the knitting.
Posted by: Courtney at June 24, 2009 4:13 PMThank you soooo much for the very clear photos and directions on doing this! I've wanted to make a blanket like this for a new granddaughter but couldn't ever figure out how to do the "pick up" part and good, clear photos are sadly lacking online or even in the books I checked. Thanks a million!
Posted by: Sandy at June 24, 2009 4:14 PMThanks for the tutorial. I do it the same as you on the first part, but I am victim to the 2-stranded pickup on the second part. I'll give your version a go next time as you made such a good case for it...very logical.
Posted by: Barbara A.M. at June 24, 2009 4:15 PMVery helpful! I wish I'd read this before I started my log cabin blanket a month ago. Next time...
Posted by: Jodi at June 24, 2009 4:16 PMArrgh. I've been picking up stitches completely wrong, I now see. I was actually looping yarn through the existing edge using a crochet hook to create the first row on the needle (maybe this is an ignorant method of "pick up and knit"? I don't know what to call what I WAS doing - but hopefully now I can take one of these approaches going forward. This definitely looks better/neater - since I have had tension issues with my "read from a book, and apparently got it wrong" approach.
On a side note - and I know you're busy - but will you be publishing the smoke ring pattern any time soon?
Posted by: elsimom at June 24, 2009 4:19 PMThank you for confirming that there is, indeed a difference between picking up stitches and picking up and knitting stitches; I've often wondered.
But...I'm afraid I'm with marie in NJ and stacey...what I see is you picking up left to right. I know I must be missing something obvious. Help, please!
Posted by: yarnpiggy at June 24, 2009 4:19 PMVery nice, and thank you for telling me I'm allowed to ignore that weird edge-knot in garter stitch. I've always disliked it.
Posted by: Becky in VT at June 24, 2009 4:23 PMTo avoid spontaneous combustion of your lower extremities while knitting anything bigger than a sock in summer, try a little table in front of you to hold the bulk of the item. You legs are free from wool underneath, and provided the table top is smooth, the knitting moves along quite well. It also helps to have another small table to the right and rear of the knitter to hold your beverage. The colder the beverage, the better.
Posted by: melanie at June 24, 2009 4:25 PMIf it is too hot to knit at home go to a public place. Airports are good (and people just sit around there and wait anyway). Maybe you would give you a reason to not mind airports so much...
Posted by: lilly at June 24, 2009 4:26 PMThanks so much for the clear instructions AND great pictures! It's so helpful that I thought I'd ask how you pick up stitches from a garter stitch square that has been knit on the diagonal... I have to pick up 20 stitches and there are only 16 rows. What's the best way to do that? My pickup row looks very uneven where I have snuck in the 4 "extra" pickups. Thanks again! Sara
Yep, that's left to right, not right to left in those pictures, and as it's the way I do it, I'll contend that it is the right way, too, whether it's right or left. If left isn't right, what's left? Oh my. But the pictures make sense.
Posted by: Ginny Palmieri at June 24, 2009 4:27 PMThis answers many subtle questions that I have no other knitting pals to ask. I very much appreciate all the photos too!
Posted by: Jan E at June 24, 2009 4:27 PMThank you! That looks so nice and neat. I'm sure this will help with my next picking up project. I'm about to attempt my first try at an edging on a cardigan so I'm excited about this tutorial. I did the double-leg pick up on my log cabin moderne blanket so I know what you mean about the backside.
Also, please use your new camera when you get to the intarsia part, too!! Thanks!
Thanks for the tutorial.
If you have a TV tray (I don't know what you call them in Canada-- it's a small, portable table used to eat in front of the TV), drape the puppy over that, in lieu of over your lap. It won't disturb the work much, but it'll keep it off your body.
Thanks for the visual. I'm gathering then, that you are doing both your picking up and your picking up and knit while the back side of the piece is facing you. That's where I always get confused, is trying to figure out which side to start from.
Posted by: Kathy in KS at June 24, 2009 4:33 PMHow about going to a local coffee shop for an iced coffee and an air conditioned lounge place to knit?
Thanks for the tutorial.
Posted by: Avedaggio at June 24, 2009 4:33 PMBtw, Stephanie - I don't have Twitter to tweet back but Calfee Design's bamboo bikes are way less than $10 000 (more around the $2-4000 mark). And if it helps, I think sawing apart a bamboo bike to steal it would just destroy it for future use!
http://www.calfeedesign.com/bamboo.htm
Posted by: Mary at June 24, 2009 4:33 PMOh, thank you for this grand revelation and confusion-busting tutorial! I am now going to rip out my log cabin bath mat and re-knit it using your expert advice. Never mind that it was on last year's list of things to make for someone's Christmas gifts; it never looked "right" because it reflected my confusion on pick up/and knit(or not).
Posted by: Ella at June 24, 2009 4:34 PMThanks for the tutorial. Good luck finding a way to kep cool enough to knit the blanket. That's a tough dilemna.
Posted by: Doris at June 24, 2009 4:39 PMThank you for clarifying whether the million degrees was in C or F. I was concerned I was imagining the wrong level of hot :)
I must need a knitting lesson (never done one of those), I'm still not very clear on why you would pick up and knit, rather than pick up than knit. For the reasons you stated about SEEING, I tend to always p/u stitches (for socks mostly), check them out then knit them. However, thank you for the useful pictures on how to p/u evenly with garter stitch.
Posted by: Jessi at June 24, 2009 4:39 PMI have been working on my Moderne Log Cabin since May. I have to agree: Giant Wool Blanket + Summer Heat = Stupidest Idea I've Had In A Long Time.
Posted by: Jill at June 24, 2009 4:39 PMSo very, very clear! This is an awesome resource. I love the fact that the internets have made it easier for visual learners to pick up (pun maybe intended) new tricks!
Thankyouthankyouthankyou!!!!
Posted by: jenn at June 24, 2009 4:39 PMThank you! This is the very first place I've seen an adequate explanation of the difference between pick up, and pick up and knit.
You're the best!
PS: You're making a log cabin blanket and not saying why, mason-dixon is deep in log cabin squares - is there a connection?
Thank you for clarifying whether the million degrees was in C or F. I was concerned I was imagining the wrong level of hot :)
I must need a knitting lesson (never done one of those), I'm still not very clear on why you would pick up and knit, rather than pick up than knit. For the reasons you stated about SEEING, I tend to always p/u stitches (for socks mostly), check them out then knit them. However, thank you for the useful pictures on how to p/u evenly with garter stitch.
(I got a moveable type error, so if this posts twice, sorry...)
Oh Gawd. Is there a third option? Because I haven't done either of those in the dozens of times I've picked up.
Well, thanks! I'm a better knitter than I was 7 minutes ago.
Posted by: Jen at June 24, 2009 4:42 PMThanks for the tutorial! I know this will come in handy when I start another bath mat. The first one looked wonkie because of the pick up vs. pick up and knit dilemma.
Thanks again
As always, you ROCK and your instructions and photos ROCK HARD.
also, on a purely personal note, thank you for vindicating my personal "pick up" vs "pick up and knit" bugaboo. :)
Posted by: Dragon at June 24, 2009 4:45 PMThank you! I have saved the pattern to use when I finish the 12 pairs of socks I'm now knitting to donate at SS for the Afghans for Afghans project (I now am on the second sock of the eleventh pair- end in sight!). Every skein I've knitted for these has a nice little ball left that I thought I would use for this blanket or a variation of it. It really appeals to the former quilter in me.
Posted by: Judy at June 24, 2009 4:48 PMI am printing and saving this post because it is so clear and so potentially useful. I always thought that "pick up" meant "pick up and knit" and have some messy pieces to show for it.
Thank you for once again adding to my knowledge of and enthusiasm for the craft.
Posted by: Laura at June 24, 2009 4:54 PMWhat if you get a small fan and put it under you knees pointed directly up? The weight of the blanket would keep it from blowing around and the fan would keep you cooler :)
Thanks for your knowledge on picking up! I'm a fan of picking up only one leg of stitches as well. The lady who owns the shop I go to always says things along the lines of, "But it's stronger!" So I vented to her about how her way is not the only way and that she does not need to retrain everyone to do things her way before teaching them something else just because she thinks her way is the only correct way. I think it secretly bothers her to no end that I knit left handed...
Posted by: Diana at June 24, 2009 4:54 PMOne of those breakfast in bed trays with legs on it might help keep the blanket off your lap.
Have you stocked up on booze yet? The LCBO here looked like New Year's Eve was yesterday.
Posted by: Dorothy at June 24, 2009 4:57 PMThank you. Very much. This is exactly the kind of tutorial needed. You've rescued a whole bunch of knitters who have committed to knitting THE blanket of the summer, apparently. Great explanation in words and most-helpful pictures.
Stay cool.
Posted by: Tressa in NC at June 24, 2009 4:59 PMyou could try a satin/silk sheet? i have a satin slip that i put on under sundress when it is super hot, and i find it keeps me cooler. also, hot water bottles filled with ice cold water, and not wearing pants helps alot.
Posted by: vanessa at June 24, 2009 5:01 PMDearest Harlot, You have accomplished what in The Twin Cities of Minneapolis and St Paul is referred to as a "Baader-Meinhof". See Wikipedia for the history of this phenomenon. Within 24 hours both you and the Panopticon have posted tutorials on how to pick up stitches and how to pick up and knit. Congratulations. (Key the Twilight Zone music) (I'm also sending this t Franklin).
Posted by: Friday's Mom at June 24, 2009 5:05 PMMaybe you could go to the library - or a knit shop (too risky?) - where you could knit in cooler temps.
Posted by: Rhonda from Baddeck at June 24, 2009 5:06 PMI laughed at the part where you mention 'losing [our] ever-loving minds' because this whole post made me do that! I have always, always 'picked up and knit' instead of just 'picking up' and this makes SO MUCH SENSE. I think I got used to PU&K (wow, that abbreviation is...awful) from making socks, and promptly forgot there was ever a different way. Thanks for reminding me about this--especially since I'm working on a small pillow for my new living room that requires picking up sts! *much love*
Posted by: Divine Bird Jenny at June 24, 2009 5:07 PMDude! You know those knitting moments when a lightbulb goes on over your head combined with the audible "CLICK" in your knittng brain?
I just had that with the Pick up stitches versus pick up and knit!
As a new(ish) knitter, it didn't even occur to me to do anything other than with the working yarn.
Dude!
I'm off to reknit a wee log-cabin washcloth, only this time with the plain pick up stitches.
Ta!
Posted by: Amanda Page at June 24, 2009 5:15 PMI wish I'd had a sneaky peak ahead in your calendar! Yesterday's page told me not to graft shoulder seams together! Duh! Too late!! I was feeling so pleased with myself for saving on the sewing up too! I'm hoping that because the yarn is pretty lightweight, I won't have the same experience as you!
Posted by: Helen at June 24, 2009 5:16 PMThank you so much! I need to save this page for the next time I'm arguing with garter stitch.
Posted by: Katie at June 24, 2009 5:27 PMWell...WELL...
don't I just feel like a monkey's uncle???
I now know to pick up is not the same as, to pick up and knit!
Bravo!
And the heat wave vs. knitting, I like Susan's idea of using a table to take both the weight of the work and the sweat off the lap of the knitter!
Good thinking!
Right about now... I want to knit in a meat locker!
These are the blog posts, the knitty-gritty as it were, that make you a genius.
Posted by: Katherine at June 24, 2009 5:36 PMI've got the AC on for you, solar-powered and guilt free. You're welcome to bring the afghan over here to work on. Thank you for the tutorial!
Posted by: AlisonH at June 24, 2009 5:38 PMI agree with Sharilyn, Melanie, and several others that a table, large or small, is your friend in the knitting-heavy-blanket-in-summer department. I was going to suggest the idea of moving the project to the dining room table. And a very cold beverage, possibly a pitcher thereof.
And thank you for the great tutorial. I've been thinking of making this pattern, and now I'm actually looking forward to it!
Posted by: Kay at June 24, 2009 5:45 PMShoot! Now I want to do garter stitch forever. I need color though. It may be time to dig into the Cascade 220 stash.
Posted by: Maria at June 24, 2009 5:45 PMI admire those very sharp needles you are using! that makes it look easier.
As above is ditto-ed by me, I learnt a lot from your tutorial, and I much prefer the neatness of your blanket to any picking-up I have done. If it were politically correct I would say 'God is in the details', however I prefer yours - 'I have no master' LOL
Posted by: StellaMM at June 24, 2009 5:48 PMRotters, dudes and gaffers! Oh my!
Posted by: Lisa at June 24, 2009 5:53 PMThank you, thank you.
Now off to donate to Megan's Ride as a thank-you to her mum.
Thanks for such a timely lesson - I'm planning to start a baby blanket with a similar pattern very soon and I was wondering how best to address this very issue!
Posted by: Kathleen at June 24, 2009 5:57 PMDang. I've been doin it rong :(
However, seeing as how I am on block 9 of 10, I'm letting it be...
Thanks again, Stephanie, for the light bulb! ;)
Posted by: Kimberlyn at June 24, 2009 6:01 PMVery helpful, as usual. :^)
Posted by: Holly at June 24, 2009 6:02 PMA most excellent tutorial, Stephanie! Thank you.
Posted by: Carol B at June 24, 2009 6:03 PMI'm another confused soul who has used a crochet hook to pick up stitches. Thanks so much for the clear explanation and great pictures.
Posted by: Linder at June 24, 2009 6:18 PMNice tutorial. I'm working on one for a friend of mine. Using self striping Patons yarn. Interesting effect. You could sit in your kitchen and knit with the fridge door wide open. Wouldn't be good on the electric bill.
Posted by: Betsy at June 24, 2009 6:21 PMTHANK YOU SO MUCH!!!
Posted by: Amanda at June 24, 2009 6:24 PMThe tutorial was very helpful, although I have followed no rules so did not become unhinged as you messed with them. :-) As for hot weather blanket knitting, how about putting one of those sealed cold packs (for injuries or strains; I have a big one) on your lap under the blanket?
Posted by: Michelle at June 24, 2009 6:26 PMThank you, thank you. This was excellent. I loved the pix with every direction. I am very much a visual learner so this really helped. By the way, the blanket looks great.
Posted by: Becky at June 24, 2009 6:27 PMThanks for the tutorial, Steph! It's been a while, and I personally miss your style of explaining technical knitting concepts (like calling the stitches "dudes"). I realize this is a very time-consuming sort of post and that you are a very busy lady, but I hope you'll still be inspired to shower us with wisdom in this form every so often.
Cheers!
Posted by: Sarah at June 24, 2009 6:32 PMUsh. Blanket + heat we've got right now + dye lot problem = unhappy Steph. Keep on keepin' on! We believe in you!
Posted by: Emily at June 24, 2009 6:38 PMThank you, thank you, thank you, thank you. I might actually make a log cabin blanket now.
Posted by: kathryn at June 24, 2009 6:40 PMThat does look nice and neat. Thank you for the knowledge transfer, I never knew the difference between pick up and knit and pick up. :) Bad me.
Posted by: ClaireWinlo at June 24, 2009 6:51 PMI just asked this question - what is the difference between "pick up and knit" and "pick up" stitches on the Knitter's Review forum. Thank you for the answer.
Posted by: Sue at June 24, 2009 6:56 PMThanks for the garter stitch tutorial!
As for the weather, remember the snow, remember the snow, remember the snow.
Posted by: Iris at June 24, 2009 6:58 PMThanks for the lovely tutorial. As for the hot-in-your-lap afghan...I put a pillow in my lap and put the afghan on top of that. When the pillow gets warm, I flip it to the cool side.
Posted by: KathyInGeorgia at June 24, 2009 7:10 PMWow, Stephanie, that was a fabulous tutorial! I've done both of these, sort of accidentally, cuz I wasn't really sure how to do either, so I just made something up. Now my technique will be more 'official' and more systematic.
Can't wait to see the finished blanket. I like the idea of using a small or larger table to keep the blanket off your legs and I hope something like that helps you.
Posted by: wooddragon at June 24, 2009 7:25 PMThat is one groovy tutorial! Put yourself down for a slab of lasagne and a big hunk of Vanilla Apricot cake the next time you're near K.C. We've got air conditioning... ;)
Posted by: silfert at June 24, 2009 7:25 PMKnitting blankets in the heat: Knit at a table. Put the blanket ABOVE your lap on a wooden surface. Far less insulating. Just saying.
(I crocheted an entire twin-size wool afghan in Costa Rica this way.)
Posted by: Elaine Marcus at June 24, 2009 7:27 PMI also don't believe in picking up both legs of the stitch when picking up bound off stitches or slipped stitch edgings. For heel flaps, I pick up only the back leg and do not twist the stitch. It makes a really nice edge and doesn't have that chain ridge on the inside of the heel flap.
Posted by: AnaMarie at June 24, 2009 7:30 PMI'm so glad you're making this blanket. I have this in my queue and these instructions have made it all super clear. Thx.
Posted by: Julia at June 24, 2009 7:34 PMI just went and tried these same techniques for crocheting an edge around the squares of an afghan I knit and they look so much better than the ones I did before. Thanks so much!
Posted by: Wendy wernigg at June 24, 2009 7:35 PMPlace a sheet or a pillowcase between the blanket and your lap? Won't be less warm but it will be less fuzzy.
Posted by: trek at June 24, 2009 7:35 PMThat is a brilliant technique. I never knew that before.
I am so happy to know that.
Thank you!
Posted by: Sarah at June 24, 2009 7:37 PMThank you for the great explanation. I've avoided a log cabin project because I wasn't sure of the pick up process. Now, I just might give it a try.
Posted by: Jane P. at June 24, 2009 7:38 PMApple glut = apple butter, apple cake, or scrumpy!
Posted by: MissLisa at June 24, 2009 7:38 PMThank you for a clear and practical lesson. I'll no doubt be referring back to this.
Posted by: Carol at June 24, 2009 7:39 PMSteph, What I do knitting here in Texas during the heat, which would be a lot of the time (geez Louise, it's hot right now), is place my work in a shallow wood bowl or shallow wicker basket on my lap. That way you've got good air circulation, and no draping wooly thing making things all the worse! Now, if I can only figure a way to make the yarn slip through my hot fingers....(talcum is very temporary...)
Posted by: Allison at June 24, 2009 7:46 PMGreat tutorial! Makes perfect sense! Now I need to translate it to socks!
I feel your heatstroke re: the lack of A/C. I usually take my knitting to the library or my mother-in-law's when I can't stand the heat. Neither place minds people dropping in and just hanging out for a while in the coolth.
Posted by: Mandy at June 24, 2009 7:49 PMA couple of questions on your otherwise very clear instructions on picking up stitches.
1. For step 1. Do you slip first or last stitch when you garter stitch? It does not look like it, but I am doing a reality check.
2. For step 3. Isn't working into the front of the stitch the "normal" way for the majority of North American knitters? I know there are combination knitters for whom that is not true, but I did not think they made up the majority, and, hence, defined what was "normal".
Thanks again. Wonderfully clear photos and directions.
Posted by: Jan at June 24, 2009 7:54 PMAlthough I've been reading your blog for years now, I almost never comment. (It's marvelous and entertaining, btw, thank you for that!)
But I just had to say, when I saw your post title I read "Picket Lines" and was ready for a political dissection of the goings-on in Toronto this week.
Posted by: jen at June 24, 2009 7:56 PMAwesome tutorial! The step-by-step instructions with the great pictures really help it all make sense. Good luck with your heat + wool blanket and dye-lot (e-gads!) problems.
Posted by: Nancy at June 24, 2009 7:56 PMThanks for the instructions!
Am I the only one confused by the photo in
Step 3?
[Which says: "I knit them. I insert the needle in the traditional manner. (If I thought that was making a big hole, I might go in the other way. EG: knit into the front of the stitch.)"]
In the photo it looks to me like the knit stitch is being made by going through the back of the loop. Normally when I knit, I knit through the front of the loop.
If I'm the only one who's confused, then don't mind me. ;)
That's great! I love your tutorials.
My question is about what to do if you slip the first stitch when knitting garter stitch? Do you pick up and knit like you did in the second set of photos?
Posted by: Sarah at June 24, 2009 8:17 PMThanks so much for the lesson! I've always been leery of that blanket for these very reasons, and now it seems so simple.
The only part that tripped me up was that I always knit through the front leg of the stitch, so you're "traditional way" of knitting through the back leg briefly gave me panic that I've been doing it wrong this whole time. But maybe that's just one of those things some people so differently.
Anyway, thanks!
Thanks for the great tutorial, Stephanie. Clear and concise.
Now as to the dye lot problem. Hmmm, can't wait to see the socks you're knitting until the issue has been settled. Dye lot problem...honestly. What's the pattern? Warm weather repels blanket-knitting. Come on, show us the socks.
Thanks again, for saving us from ourselves!
Posted by: JD Collins at June 24, 2009 8:18 PM>(Also, the fact that it is a million degrees >(Celsius) in an un-airconditioned house makes >draping this thing on my lap seriously >unappetizing. Gotta figure a way around that)
Local library. Usually air-conditioned and relatively serene. Books available for distraction.
Posted by: Jennifer at June 24, 2009 8:29 PMThanks for the tutorial!
Posted by: fibercrone at June 24, 2009 8:29 PMHow's Meg's hand?
Posted by: Presbytera at June 24, 2009 8:29 PMDo you have a card table? Or a folding TV tray? A comfy chair you can pull up to your dining room table? I'm just thinking of something you could place the existing blanket on that would keep it off your lap, yet enable you to keep knitting.
If it's just long enough to get onto a surface but too short to stay put, you could always weight it with something heavy. Stack of knitting books?
Posted by: hillary l. at June 24, 2009 8:31 PMOoh! Thank you! This makes so much sense, and makes me so much happier about the whole "pick up" vs "pick up and knit" thing (now that there *is* a versus, and not just a "two ways to say the same thing"; so much more sensible). I'll definitely be keeping this in mind in future.
Hope Meg's hand is starting to heal up...
Posted by: Jocelyn at June 24, 2009 8:33 PM...the only thing you should have on you when you have to be knitting a blanket draped across you in the heat is a fan...
Posted by: Donna at June 24, 2009 8:33 PMWell, that is way to freakin' cool, and you just answered my eternal question about the difference between "pick up" and "pick up and knit", as well as how to pick up stitches when you're going to see the reverse side. Bless you!
Posted by: Suzanne (Yarnhog) at June 24, 2009 8:36 PMTry washing a load of sheets and hanging them in your livingroom to dry. That's what I just did. Evaporative cooling! (That's assuming it isn't also a million percent humidity in your house already.)
Posted by: Heather at June 24, 2009 8:37 PMI just love demo's! Learn something every time.
Thanks a bunch!
Wow, Stephanie! I've been knitting for 40+ years, and this is the first time anyone explained this in a way that made sense! Now I'm slinking off to re-knit the log cabin blanket I started out of some pretty pricey O-Wool... and childishly ripped out because my picked up stitches looked like %$@#!!! Thanks!!
Posted by: Jan at June 24, 2009 8:46 PMThank you!! Very educational and rewarding.
Posted by: DeeDee at June 24, 2009 8:50 PMYet another clear, concise and illustrated lesson of something I had been doing wrong for years! Those techniques make the difference between "Did you make that?" and "Where did you buy that?"
Posted by: Liz at June 24, 2009 8:55 PMI am knitting a blanket in the same yarn. It's not a log cabin blanket but Im having the same draped all over your lap thing
Posted by: madeleine at June 24, 2009 8:57 PMThank you for the very clear directions! I like all of the pictures - they are helpful.
Posted by: Linda at June 24, 2009 9:11 PMKudos to you, girl...damn....knitting this without a coolness to your surroundings....you are one gutsy, pioneer woman. yeah yeah.....I know that air conditioning hasn't been around forever (unless you lived near an ice house), but in our more advancing years....comfort comes to mind????
love
Posted by: Christine at June 24, 2009 9:19 PMThanks for showing that! I have never taken a knitting class except for my next door neighbor who initially taught me to knit, and a college buddy who taught me to purl a month later. My pick ups have always been very messy, and I this will help alot. Thanks.
Posted by: Marita at June 24, 2009 9:21 PMWhat a fantastic tutorial/pictorial! This definitely makes me want to try one of these blankets now.
For working on a large blanket when it's too darn hot to have the sucker in your lap, try working on a table. Put the blanket on the table, scootch your chair in nice and close so you can have good knittng posture, and knit away!
To make it slightly more like knitting away comfortably on a comfy couch, put an ottoman under the table!
While the blanket is still small-ish you can accomplish this at a couch or easy chair with the aid of a TV table, too.
Just tell Joe he has to get his patch bays or CPUs or speaker cables or whatever off of the dining room table!
Cheers
Michelle
Thanks so much for this tutorial! I'm planning on starting this pattern soon (for a wedding gift in December, because one can never be too careful), and these directions will be oh so handy.
Posted by: mick at June 24, 2009 9:26 PMI should probably read the 100+ comments to see if I'm repeating anyone else, but I'll give my advice anyway. Re: knitting a blanket in the heat -- I have one of those tray tables "as seen on TV" that you can pull right up to your belly (the legs are c-shaped and slide under your chair) and I let the blanket sit on that. It still does create a little tent heated by your body and the muggy day, but it's not nearly as awful as letting the blanket sit on your lap in a million-degree heat. Ugh!
Posted by: Maryann at June 24, 2009 9:37 PM thank you i do not consider
picking up stitches a fun time
tis been 100 degrees in florida heat
index 115 i knit small stuff
if your head starts to hurt
go to a cool place please
thank you for showing me how to pick up stitches. Also as I live in Texas where it is now 104 degrees F I ub=nderstand not wanting a large knitting project in your lap. Here is an idea: sit at the dining room table with the blanket on the table in front of you and most importantly off your lap.
thank you for showing me how to pick up stitches. Also as I live in Texas where it is now 104 degrees F I understand not wanting a large knitting project in your lap. Here is an idea: sit at the dining room table with the blanket on the table in front of you and most importantly off your lap.
What a great tutorial, with your usual aplomb, no less. "Rotters" and "dudes," so awesome! I'm bookmarking this post so I may refer back when I finally knit my own Log Cabin. I did a sort of half-assed take on it (kind of) and did not know to bind off and pick up, and it came out, well, not like yours. Live and learn.
Posted by: bipolarbear at June 24, 2009 9:47 PMCan you show left handed people how to do this?
because if you're right handed, then when you pick up titches left to right i should pick them up right to left?
so confused...
please help a lefty
excellent tutorial!! thank you!!
Posted by: alison at June 24, 2009 9:53 PMawesome! it's a beautiful blanket and I'd like to make it sometime when I finish the quilt and 1/2 dozen other projects I'm working on. Thanks for the tutorial! I was curious as well but didn't ask. you're the bee's knees.
Wow, I didn't even know what I didn't know until I read your explanation. I never ever just picked up stitches from a pre-existing piece and used them as active stitches before--how streamlined and unbulky that is! Thanks for the detailed lesson. Even someone knitting 28 yrs learns something once in a while!
Posted by: Dawn at June 24, 2009 10:00 PMSteph,
Thanks for the pix. I'm currently working on an Einstein jacket for my niece, and have been debating what looks best; your illustration has been illuminating!! 8-)
As for knitting a blanket in the heat, maybe it would be similar to the problem of breastfeeding in June and how to stay cool and minimize the heat for the baby. He laid on a cotton blanket on the table and filled his stomach to his hearts content. We were both relieved that his mom had enough common sense to figure that out. Thanks for bringing back that 29-year-old memory.
[You could just knit socks but for the deadline!]
Looking forward to seeing you in August.
Posted by: Mary Kay at June 24, 2009 10:08 PMPlease M'am, a question...which do you use for sock gussets? i use pick up, as you have described and then i knit them twisted. it makes a pretty little loopy. i stopped trying to learn entralac because i could not pick up in a way that i liked, i.e. without a big lumpty mess. maybe now that you've lessoned us, i can.
Posted by: marie in florida at June 24, 2009 10:09 PMI think your blanket is beautiful. I've thought about making this blanket for awhile now... you've inspired me! A suggestion: Try putting the finished portion of the blanket in a pillowcase while knitting. It will take up less space on your lap, and the cotton of the pillowcase will be a lot cooler than the blanket. Keep up the beautiful work.
You could make chore assignments for the day and hie thee to the nearest coffee or knitting emporium with air conditioning and commandeer your own little corner. Deadlines call for creative problem solving.
Posted by: leslie at June 24, 2009 10:20 PMGreat lesson and pictures. I will be using this as a reference in the future.
I am excited about August!
Oh, this is so so perfect. If only I had read it a couple of hours earlier. I just finished making (another) one of your "Daisy" pattern sweaters for a grandchild to be (due in Sept). The neckband would have been much neater if I'd seen this first. BTW, I love that pattern and thank you (mentally) each time I make it. You wrote this pattern before you were the Harlot even!
Posted by: SallyA at June 24, 2009 10:33 PMIt was 100 deg here in N. Ontario today too..unbelievable..but no humidity..I knitted while sitting on the deck.
Thanks for the tutorial, wish I had known this sooner, so many new things after no knitting for 30 years...I have missed so much.
Posted by: Val at June 24, 2009 10:41 PMHey, that was really interesting. Thanks so much. And I'm glad you don't know what to do with that little garter knot (well, 'ignore it' does count, I guess) either. It always baffles me, and I always think I goofed in some way by creating it. Hm.
Posted by: Kay at June 24, 2009 10:42 PMthanks - really helpful!
Posted by: Margie in Maryland at June 24, 2009 11:06 PMThank you - good pix, clear description, reassuring, I got some by common sense!
Knitting at a coffee house is fun and effective as long as it's air conditioned. No guilt - sharing the cooling.
Hoping Meg is healing easily and quickly.
Posted by: Juliet in Grand Rapids at June 24, 2009 11:11 PMFor what it's worth - I have been log-cabinning around squares made by other people (trying to get them all the same size so I can sew them together for a blanket) and the pick ups are a LOT easier and neater on the squares which have a pass the first stitch over the second stitch bind-off, rather than a knit 2 together bind off.
Posted by: Tracey at June 24, 2009 11:12 PMthank you for the great tutorial! we have been discussing this in my knitting group, involving women with about one million years combined knitting experience peering at online photos and reading instructions that just say "pick up stitches" with no explanation and thinking why hasn't anyone put that in pics yet. Well, you did!
Posted by: NewJerseyLaura at June 24, 2009 11:16 PMI applaud your efforts at keeping knitting language crisp.
Nice tutorial, too.
Posted by: twinsetellen at June 24, 2009 11:22 PMStephanie, a question--when you pick up the stitches on a garter side/edge, do you pick up every loop, or do you pick up every three out of four, or?
Posted by: Ro at June 24, 2009 11:23 PMI worked on a panel for the pencil-shaped crocheted water tower cozy; the panel was sized to be 7 feet by 14 feet, so there was a lot of fabric being made row by row in triple crochet. At a certain point it became too unwieldy to keep in my lap as I worked. So I cut some lengths of a different color yarn and after folding the piece up a few times I tied the panel "closed" along the edges and in two places in the center area with the yarn. I then had a bundle that was flat and easier to turn as I continued crocheting. As I added more rows I'd retie the panel. Maybe you could do the same with this blanket.
Posted by: PurpleGirl at June 24, 2009 11:25 PMA million thank yous for the clear explanation and pictures! When I have been trying to pick up stitches on projects in the past it had led to lumps and lines in all the wrong places and generally looking wrong. You explanation and pictures are a true help and answer questions I have had (never having seen anyone do this myself.)
thank you again. Kelli
Great pics and explanation...except...the only way that I can think that you were able to take those pictures yourself was by pushing the button with your tongue or a pencil held in your teeth
Posted by: Annie at June 24, 2009 11:46 PMThat's why mine in stalled too - mine is much bigger now and even though I used Rowan Calmer it is way too hot - rather knit socks !
Posted by: SamLaTricoteuse at June 24, 2009 11:46 PMAbout the LCBO strike mentioned in your Twitter feed: Did you know that some of us also stash wine?Truly some days the well-stocked wine cellar/liquor cabinet is much more important than the yarn stash. Some days a wee drop of something helps me be a much nicer mommy/wife/person.
Posted by: kathy at June 24, 2009 11:59 PMThank you very much,the application for those is very very clear!
Posted by: cecelia at June 25, 2009 12:38 AMWon't work all the time but deal with the no airconditioning in the house by taking the project to work on in the library or other public airconditioned place. Get up earlier and take a nap in the middle of the day when it is warmest?
You are clever, you will find a way. I do find that washing my hands often and even going so far as to sprinkle a little baby powder on them deals nicely with knitting wool in Florida in the heat.
Thanks for making the distiction between "pick up" and "pick up and knit"
the distinction for the second term makes it click in my mind for what i need to do for socks.
terminology is so key.
Posted by: steven Ambrose at June 25, 2009 1:00 AMBrilliant! I have been picking up and picking up and knitting for years. Wrestling with the knot and picking up both legs. Your results are magnificent and have converted me. I think I will try the mitre square blanket again and will be much happier with the results.
Posted by: Vickie at June 25, 2009 1:04 AMWait a minute, you said this was going to be a boring blanket project, and here you are making it stunningly interesting.
And well timed too. I was just struggling with picking up for an icord edging and not happy with the result. Now I can cheerfully rip back, do it much more sensibly and make it look better too. Thank you, thank you.
Posted by: Needles at June 25, 2009 1:17 AMYou need an electric fan, Stephanie. My sympathies: (active sympathies: my own air conditioning was broken all weekend, can you imagine trying to touch wool when it's 95°F (35°C)?)
Posted by: Cactus Wren at June 25, 2009 2:35 AMExcellent tutorial Steph... and as for the a/c thing, all I got for you is to go knit at the mall... because I'm knitting socks this summer for the same sweaty reasons!)
Posted by: shanny mac at June 25, 2009 2:40 AMGreat explanation except where you have confused me by saying "I knit them in the traditional way" - would that not be by inserting the needle into the FRONT of the stitch, not the back?
Posted by: Elaine at June 25, 2009 3:26 AMThank you so very much for this tutorial! As for heat, I have a small table about 2 feet square and normal dining-table height. I sit with it in front of me and put the bulk of my work on it. The knitting flows over the edge of the table and I have room to work on it without having it actually in my lap. I did three baby blankets like this last summer, for an October baby.
Posted by: Margaret at June 25, 2009 4:34 AMWell, now I realize that 1/4 of the way through my Modern that I am picking up stitches sub-optimally. I'm not frogging.
PS - it's like 8000F in Houston (similar to what I'd imagine the surface of the sun feels like), Modern is a winter-only knit for me, my brother may get it by 2025. Maybe.
Posted by: Katie at June 25, 2009 6:15 AMGreat tutorial!
Got one of those breakfast-in-bed" trays with legs? Maybe you could put that over your lap and drape the blanket on that?
Posted by: AmyS at June 25, 2009 6:33 AMStephanie, thanks so much for such a clear and easy-to-follow tutorial on picking up stitches from a garter edge AND a bound-off edge (it's two tutorials in one!). Not only are your photos detailed and clear, I love the way you explain *why* you do things a certain way as opposed to making a different choice.
Posted by: Ann Rose at June 25, 2009 6:57 AMThank you! Definitely one to refer back to in future.
We were having the pick up (and knit?) debate about sock heels at S&B recently… though thinking about it, if you didn't knit then, wouldn't the working yarn be in the wrong place? May have to insist everyone in the group creates a step by step of what they do with sock heels, to compare.
Posted by: Rhian at June 25, 2009 7:10 AMThank you, Stephanie. Those instructions are terrific!
Do you have a "breakfast in bed" tray or a mesh sweater-drying tray? Either of those might be good to hold your blanket while you knit, allowing your lap a little air...
Posted by: Peg at June 25, 2009 7:17 AMI only knit lace in the summer (and squares for charity lapghans- but I don't put them together until the fall) for that reason. The heat and knitting don't seem to go together although I lived in Florida for a good portion of my life and still learned to knit.
I love love love to cast off! The edges fill my heart with joy. I would always rather cast off then have live stitches. I like non-stretchy knitting. And cast off edging.
Posted by: samantha at June 25, 2009 7:28 AMThanks for the tip. I am doing this blanket out of burgendy, yellow gold, and black yarn. I wanted something bold first of all. And well acrlic yarn is cheep to use on a first blanket. lol.
Anyways I was concern about the back area of the blanket and if it was turning out right. Mine is almost right. I do like how you use two techniques to pick up the stitches. Its easier then trying to get them all on the needle all at once. I am going to try it and see if it works better for me.
Thanks!!! Cant wait to see your finished project. Since it will probably be done before mine. lol.
Posted by: Diane at June 25, 2009 7:31 AMLove this tutorial!! Thank you! I've been wanting to make this blanket and have to admit that I was intimidated by all the stitches that I would have to pick up. I am intimidated no more---THANKS!!
Posted by: Eileen at June 25, 2009 8:05 AMGeothermal! We just got our system installed in our 109 year old house and it works like a dream. Also not as environmentally impactful and having AC and heat all in one is amazing. Of course it didn't hurt that we Americans get a lovely 30% tax credit this year but maybe you can convince Canada too-you've got connections right? Thanks for the tutorial! I'm currently working on a baby blanket square swap and have always been curious of how to join garter stitch or pick up edges on it.
Posted by: Nina at June 25, 2009 8:25 AMI think maybe even I could do that. If I could I would be one step closer to conquering my sweaterphobia, which consists in large part of pickupophobia.
If you ever teach a class on seaming reverse st st, I'll take it. (I know it can be done, I just don't know how.)
Posted by: Lucia at June 25, 2009 8:56 AMVery neat! I pick up garter the same, but also pick up the bind-off edge instead of pick up and knitting. I use a much smaller needle (a dpn) to do the picking up. (The bind-off stitches are tighter, so getting the same size needle through them is a pain.) And I use a dpn, because I'm right-handed, so I'm faster picking up right to left. Then I can just slide the needle down and knit off the other end. I do only pick up one loop though, so I think the result is pretty similar.
Ro at 11:23 PM, from the photo it looks like Stephanie is picking up every other row (which translates to every bump on one side of the garter edge). Which I think is pretty standard for garter, or at least as standard as anything is in knitting! I just finished a baby blanket Moderne, and that's how I did it too--it seemed to work well.
Posted by: RobinH at June 25, 2009 9:00 AMI should add that one of the things I love about these technique articles is that I get to see not only what you're doing, but to read in the comments about all the other ways things can be done. Which is why I commented with my own method (which seems to be slightly different from anything else I saw in the comments). :)
Posted by: RobinH at June 25, 2009 9:07 AMLissa, I have the same question as you (about the photo in Step 3 and the "traditional manner"). Perhaps the answer is the stitch mount? Not sure.
Thanks for this tutorial and it really makes me want to knit acres of garter stitch! After it stops being 93 degrees in *my* house with no air conditioning ;-)
Posted by: kate at June 25, 2009 9:11 AMFunny thing. I "pick up and knit" exactly the same way you do, but I had to read your instructions twice. I would have described it completely differently.
Posted by: c at June 25, 2009 9:38 AMOh, sweetie, you had me thinking of doing a log cabin blanket using my stash of Lamb's Pride worsted, one of my favorite yarns, til I got to the part about it being hard to work on in the million-degree heat in Toronto. Ahem. It is 20 degrees (Farenheit) WARMER here in San Antonio (gonna be 36 degrees C today). Sigh. I miss knitting with aran-weight wool. Maybe I better wait til January, when the temperature goes all the way down (ha!) to 50 degrees Farenheit (10 C).
Posted by: Rob at June 25, 2009 9:39 AMSometimes when I'm making something big and I don't want it draped over my lap, I get out the ironing board and throw the work over that. The ironing board acts as an adjustable height table next to the couch or the diningroom table.
Posted by: jl at June 25, 2009 9:40 AMSuggestions of knitting naked would probably exacerbate, rather than alleviate the problem. In cases of extreme summer heat knitting monogamy can be ignored without it counting as breaking any rules or contracts. Thank you for the tutorial. I've used both methods, but had no idea that there were actual names for them... who'd of thunk it?
p.s., something in a nice silk or cotton might be soothing to knit in this heat... maybe another version of the knitted cowl we've all be waiting on size 000 needles to get the pattern for.
Thanks so much for the tutorial. I don't particularly like picking up stitches OR picking-up-and-knitting stitches because I always seem to go at it willy-nilly. It leads to interesting results at times.
As to the heat - put a tv tray or a card table in front of you and pile the bulk of the blanket on that instead of in your lap. It's also handy for holding icy, yummy beverages while you knit. (Glass/bottle cozy suggested to reduce seepage into the blanket.)
LOVE the blanket!!!
Posted by: Roadchick at June 25, 2009 9:55 AMWho knew you could get so much blog milage from a garter stitch blanket? This is a fantastic tutorial. I've been disappointed with my past garter blankets and this makes a world of difference.
Posted by: Carol at June 25, 2009 9:58 AMSpiffy! Well, except for the million degrees part. That sucks.
Posted by: Riin at June 25, 2009 10:01 AMWow, thanks for turning on the lightbulb! I second the question about whether you slip the first/last stitch when knitting garter. Also, what bind off method are you using? Oh, I guess I am just full of quesitons today (which is probably better than what I am usually full of...) are you binding off all of the stitches or "turning the corner" with the last stitch of one block as the first stitch of the next block? Thanks for taking the time to help so many knitters with this post!!
Posted by: Jennied at June 25, 2009 10:01 AMThanks a lot ! This one is a great and precious one !
Posted by: daniele at June 25, 2009 10:19 AMVery helpful post to a complete knitting "noob"! The photos were terrific - thanks! I've bookmarked this post in case I ever attempt something like this. Am in Toronto too and agree with you about it being too hot to knit a blanket in this weather! Might be an excuse to move onto something else???
Posted by: stitchyalli at June 25, 2009 10:48 AMYour back looks much neater than mine! I'll have to keep that in mind if I make a blanket like this again.
Maybe if you have a scientist friend with a cold fridge (like a -70 C, but not that cold, because there is no reason to die for your art), then you could hide in the cold fridge with a hat, mitts and the blanket and get a good hour in before it was time to come out of the deep freeze!
Posted by: Seanna Lea at June 25, 2009 10:50 AMTHANK YOU
Posted by: gammaheder at June 25, 2009 10:53 AMI'm going to be knitting the Moderne Baby Blanket soon and I just want to say Thank You, Thank You, Thank You! Picking up stitches has always been a bit of a mystery to me - this is the best, most clear explanation of the process I've seen. Once again, Thank You!
Posted by: treebee72 at June 25, 2009 10:53 AMDrape the bulk of your blanket over a snack tray and knit away. Much cooler that way!
Judi
My brain is sizzling from this amazing tutorial. Now I understand! Thanks Steph!
Posted by: Roz at June 25, 2009 11:19 AM"I know no master" - love!
How about bare feet in a container of cool water, with or without peppermint oil in? How about iced coffee instead of hot? Ceiling fan, do you have one? Makes a big difference.
You write exposition really, really well.
Don't drop yarn in foot bath!
Your blog is so good.
Posted by: Patti (from Ottawa) at June 25, 2009 11:21 AMGreat pictures and directions. Hope you're able to resolve the dye lot issues. Hope the weather cools off a bit.
Posted by: Meg at June 25, 2009 11:53 AMNow for some cold drinks to cool off ....
Posted by: Bareara L at June 25, 2009 12:15 PMStephanie, thank you so much for this tutorial! I had definitely been unable to process the difference between "picking up" and "picking up and knitting" stitches, and so my EZ blanket had been languishing with only a quarter done. This is so helpful, and where I live it's bloody cold, so the idea of sitting and knitting a big fluffy alpaca blanket very much appeals and now I can finish. Thank you!!!!
Posted by: Katie at June 25, 2009 12:18 PMI'm also confused about photo 3 and the "traditional manner"--it actually had me wondering if I've been knitting twisted stitches all this time for a confused moment!
Thanks for this--between you and Franklin at the Panopticon, I feel entirely educated on this task--and just in time to pick up stitches along the edge of the lace bands for the Uhura top (from the new Twist Collective) that I just started!
Posted by: Erin at June 25, 2009 12:20 PMThanks for that. I actually read all of it and am going to use some of it. Your reasoning behind the one-leg pickup thing is genius.
Posted by: Cecelia at June 25, 2009 12:28 PMI honestly didn't know there was a difference between "pick up" and "pick up and knit." You've enlightened me! tee hee.
I'm also working on a garter stitch blanket (OpArt from knitty.com) and can only work on it in the early morning, or if I go over to my parents house where they have central air. I feel your pain!
Posted by: tara at June 25, 2009 12:31 PMhi! Thanks for straightening that out. It was an experiment I always meant to do but never took the time for. Your project is definitely one that cries out for the optimum solution to look its best.
I think I have virtually always "picked up and knit". Sometimes even pulling the working yarn through to make a loop and then going through that loop again and "knitting" the stitch with the working yarn before making another. I guess all this time I thought a working yarn was always being asked for, and that "pick up and knit" required another stitch motion in addition to the first loop-making one. I must have some very odd (but no doubt functional) knitwear floating around out there!
Posted by: Karen at June 25, 2009 12:42 PMThat is a snappy way of picking up and picking up and knitting stitches. Thank you so much for the direction and the photos. I admit to some real confusion and angst when I come upon directions about picking up/knitting.
Bravo
Great essay! Thank you!
I'm knitting lace right now, and my suggestion for you blanket is, knit at the table. Drape the already knitted portion on the table. Put a fan under the table, aimed at your legs. Put the needles as far over the edge as you need to to knit, and there you are! For my lace, I use the arm of the couch . . . same difference.
Posted by: Camilla Hadlock at June 25, 2009 1:01 PMI see that someone has mentioned the tip about holding your knitting in a bowl. I'd like to expand on that. I use a stainless steel bowl to hold the knitting. This helps to keep my lap cool and to easily turn the knitting by turning the bowl.
Posted by: Kim M. at June 25, 2009 1:10 PMAlright, I see now. I've been wondering about that.
Posted by: Joey B. at June 25, 2009 1:14 PMI hate to say it, but I'm still confused.
What's the practical difference between putting all the picked up stitches together onto the left needle, then knitting, versus picking up one stitch at a time, knitting each as it comes?
It seems like in both cases the left needle lifts up a piece of the existing work to make a loop, then the right needle makes a stitch by passing the working yarn through that loop. The only difference that I see is that in the first case, you pick up several loops before knitting, while in the second you do this one loop at a time.
If you're talking about the stitches that result, I honestly don't see a difference.
Are you focusing on the technique itself, rather than the result? If so, what's the advantage of one over the other?
Posted by: Rana at June 25, 2009 1:22 PMI think that a box fan propped against a footstool aimed at your legs could accomplish the fete of keeping you physically cool while you emotionally stew over dye lots. Hang in there!
Posted by: April at June 25, 2009 2:15 PMI say take the blanket to a public airconditioned space like a bowling alley, indoor pool or better yet- a skating rink. Put up a sign: Will knit for food.
Posted by: Angie at June 25, 2009 2:21 PMNow, if I could get a conversation like this at a Knit Nite, I would go - but they always seem to be gossip sessions, so I don't go. Wish I had this kind of tutoring - please, please keep doing this kind of blog occasionally. It is so helpful - and fun.
Posted by: Carol at June 25, 2009 2:32 PMWhat I want to know is how did you take those photos? Did you hold the camera under your chin? Did you just rest it on your chest and use your chin to snap the photo? May be you put your feet behind your head and used your little toe to press the button.....
Posted by: Beth from Bismarck at June 25, 2009 2:49 PMSo helpful. I just got the Mary Thomas Knitting Book which has a very similar discussion to yours (without the pretty pictures). Cast a new light on things for me even though I've been knitting yeah these many years.
Posted by: Dianna at June 25, 2009 2:52 PMAs luck would have it, I'm working on the Baby Moderne right now so I have enjoyed watching your progress (and I know exactly what you mean about all those garter stitches!). My edges were looking a bit wonky but this system definitely will help me tidy things up a bit. A big bit! In fact, I plan to do some ripping back. Things will be more pleasing and I thank you!
Posted by: Meg at June 25, 2009 2:56 PMThank you! I have been struggling with a good way to pick up and knit and your explanation solved it for me. I'm working on a cardigan with a big shawl collar and it will come in very handy.
Posted by: Kristin in London at June 25, 2009 4:41 PMBrilliant instructions, thank you so much for sharing, and clarifying! I always thought "pick up" and "pick up and knit" were the same thing (and I know exactly which book made me think that...hmm...) but it never made sense why the same thing should have two different names. THIS, on the other hand, makes perfect sense. Thanks! =)
Posted by: ashpags at June 25, 2009 4:41 PMOkay. I'm blinking in shock here. I've been knitting north of 20 years -- and my sainted teacher never told me there were 2 ways to pick up stitches. No wonder my work looks raggedy -- I've only been doing the 'pick up' method, and you're right, it doesn't really work with the one direction of work. Thanks so much for the lesson!
And that blanket is gorgeous. I had to join Ravelry just to get the pattern. I owe afghans, so off to knit I go!
Posted by: Shel at June 25, 2009 5:01 PMPut the blankie on a table you can sit at.
Thanks for the pics, I love seeing other people work.
Oh, but I like the "knit for food advice"!
Put the blankie on a table you can sit at.
Thanks for the pics, I love seeing other people work.
About the hot weather - maybe take your knitting to the nearest air-conditioned library?
Posted by: Claudia S at June 25, 2009 5:15 PMsee, finishing sections and then picking up stitches would have been a much better way of knitting my blanket for my baby niece vee... you actually saw it, there was a picture of the blue, yellow, and orange blanket on this blog a while back... because when you do it as one continuous piece of knitting, the desire to set fire to it (as if i could have dealt with the loss of a) all that work, and b) all that yarn) becomes nigh overwhelming...
Posted by: Mary at June 25, 2009 5:28 PMSteph,
Thanks for the tutorial. Now I have yet another set of your nifty tricks to put in my knitting bag! I absolutely empathize with your dye lot issue(my complicated cable cardigan was set back due to one of those). To help minimize the blanket weight, place the blanket on that breakfast tray Joe and the girls got you for Mother's day years ago. It'll finally get some use. ;) On an unrelated note, my DH told me that I wouldn't need to knit him a gansey when he builds his wooden row boat. You have no idea how happy that makes me.
Hey, thanks for the tutorial.
And as for the knitting hot items in an unair-conditioned home, I feel the pain! Probably part of the reason why I don't get much knit during the summer months... Note to self: Knit in a/c'd buildings, even if it winds up being the local library...
Posted by: Kat the Knitter/Crocheter at June 25, 2009 8:15 PMthanks for the helpful tutorial
Posted by: ikisti at June 25, 2009 9:06 PMComing from a dryer and more inhospitable climate to the craft of knitting I have one word for you. Fan, a high powered fan, the kind of fan that blows your hair around and feels as if it is making your face look like a puppies out of the window of a speeding car. Also sometimes a tub of ice water for the feet takes the edge off.
Also thanks for the tutorial.
Posted by: Nalani at June 25, 2009 9:10 PMI'm just going to add my thanks to the long list - started the VERY SAME BLANKET (in totally different colors) about a year ago, and it's sitting in one of my WIP bags because I don't like my joins - it will be frogged and re-knit with the joins much more like yours (i hope). Thank you!
Posted by: Angelina at June 25, 2009 9:55 PMStephanie, you did a great job on the tutorial; Thank you! I'm still puzzled by the subtle difference between "pick up" and "pick up and knit" because it seems like either way, each stitch will be picked up AND knit in due time; but it's usually best if I wait until the weekend to ponder the existential questions such as these. I'm sure a lot of readers will be referring back to this one.
Posted by: Nina at June 25, 2009 10:08 PMFABULOUS tutorial. Thank you ever so much! I was taught basic knitting as a child, but the rest of it I've learned on my own. I'm definitely rough around the edges. It helps to have someone demonstrate some of the finer ways to accomplish a technique!
Posted by: Robin Marie at June 25, 2009 11:04 PMFantastic tutorial Harlot!I need to file it in my favorites straight away!
Posted by: Chris in Knitvada at June 25, 2009 11:06 PMon the dye lot, you are screwed. Ecospun does not have dye lots. It has batches. They aim, I hear, for a rage of colors from dark to light, and they just mix. That said, there is no rule that every log of the log cabin needs to be the same width, or that each log needs to end the same color(s) it started with. Go look at the Gee's Bend quilts, you'll feel much better about the wabi sabi that is life creeping into your blanket.
Posted by: laura in alameda at June 26, 2009 12:35 AMI will repeat the others who suggested going to the nearest air conditioned library.
I did that a few years ago. A knitting librarian started a knitting club in the air conditioned coolness over the supper-time break so she wouldn't be knitting alone.
It was quite an enjoyable weekly event. We even managed to teach several children to knit!
Janey
Posted by: Janey at June 26, 2009 1:40 AMThis is WONDERFUL! Thank you!
I only have one little question, about step 3:
"Step 3. I knit them. I insert the needle in the traditional manner. (If I thought that was making a big hole, I might go in the other way. EG: knit into the front of the stitch.)"
What is "traditional manner" here? For me, traditional manner for knitting is to knit through the front loop, and the "other way" is to knit through the back loop, which is usually what I do when I'm picking up stitches so it doesn't look gappy.
Posted by: Heather at June 26, 2009 9:50 AMwow. those are perfect picked up stitches...and as a (mostly) self-taught knitter i have to say that i never appreciated the distinction between picking up, and picking up and knitting. until now.
thanks steph!
Posted by: courtney at June 26, 2009 10:42 AMPop that sucker in the freezer for awhile, and you will be glad to have it in your hot little lap.
Posted by: Jeannie at June 26, 2009 1:27 PMThanks for the information.
I always love learning from experienced knitters and especially ones who know what they're talking about and know how to explain it to you.
Thanks again.
THANK YOU SO MUCH!!! I've been knitting for over forty years, and this is the first time I've truly understood the difference between "picking-up stitches" and "picking-up-and-knitting stitches."
YOU ROCK!!!
Thanks for this most excellent tutorial/explanations of why you do it the way you do and clearing up the "Pick up stitches" vs. "Pick up and knit" thing. Love it!
Posted by: Beverly at June 26, 2009 5:23 PMThanks for the lesson with photos! I've been wanting to make this blanket but have put it off. Your directions are very clear. I know it's very boring for you but beginners like me appreciate the step-by-step details.
Posted by: Mel at June 26, 2009 5:58 PMWhat perfect timing- I just finished shaping the heel on my first sock and have to pick up a bunch of sts now. This makes me a thousand times more confidant that I am doing it right. Thanks, Steph!
Posted by: Mary Catherin at June 27, 2009 1:48 PMI just want to say thanks for the little tutorial here because when i attempted to make a log cabin sample, it was a mess. 2 days later you show this. I try it again and now i have the full blanket coming along with perfection thanks to you and your ways of picking up. Wait till the girls at knit night see it....theirs has ridges, big ones on the wrong side...i'll have to show them your trick!
Posted by: Kimberly at June 28, 2009 9:45 AMAbout dealing with the heat thing - I just position a fan to aim at me, especially my hands and run it at high speed. It gives satisfactory results.
Posted by: Nancy McElroy at June 28, 2009 12:19 PMWhat an excellent tutorial! We were just discussing techniques in my knitting group the other night. Will tell folks to read this. Better than any explanation I've read.
Posted by: Aubrin Miale at June 28, 2009 7:25 PMThat's awesome. I've been trying to figure this sort of thing out for ages.
I think this fall I may start a log cabin blanket of my own. I am also lacking in the AC department, and the thought of a blanket makes me sweat.
Knit in the tub. :o)
Posted by: Annalea at June 29, 2009 1:46 PMWAAAAhahahahaha!!!!
You made my log cabin look stupid! Why could I not have had this tutorial BEFORE I knit mine! I am almost done and now....I will be embarrased to send it..knowing that it could have looked much better...
(snif snif)...Oh well. I will do another one for my couch and will do better. Yarn Harlot strikes again!
B. Rickman
Posted by: bjr at June 30, 2009 8:57 AMWait, I got busy for a couple of weeks and now you're sweltering?
Did I miss Canadian Spring, again?
Posted by: Julie at June 30, 2009 11:28 PMI use an old aluminum tray table to keep knitting off my lap in hot weather. Keeps a layer of air between me and the knitting - definitely helps! I have to sit in a folding lawn chair - all my other chairs are too wide for the tray table to fit, but it's worth it,
Posted by: Elizabeth H. at July 1, 2009 5:05 PMBest explanation of where to pick up on the sides of garter stitch that I've ever seen. Thank you so much Stephanie!
Of course, like so many above, the info comes a little too late to help on current project. =P
Ah well, so it goes. I ended up finally ignoring my pattern, working a slipped stitch edge, and doing a pick up and knit from there, rather then try to maneuver the garter edges. Working for me in this application, but now I know better!
Not a clue what you're talking about, but I envy your knitting. Lyrical stuff. Can it be true that knitting also separates the sheep from the goats, just like painting or pottery? Is there a Famous Knitters School that advertises in matchbooks? No one would waste a Fender on my tin ear and the spastic rhythms in my hands. How could I have believed that a $6 ball of wool and a pair of metal splinters would be well entrusted to my hamhanded enthusiasms? Some of us are musicians. Most of us are only blessed with ears that hear and earthbound souls that want to soar. Impaled like Mephisopheles on this comparison, let me say that your work is inspirational only to the gifted. I, and my plebian kind, know only awe.
Posted by: Dave Oshel at July 10, 2009 2:09 AM